Customizable Printed Sticker
PRODUCT ID: t1171 Upload File
 Background
 Layers
Saving Design...
Please wait while we save your design. Do not close this window or navigate to a different page.
Instructional Videos
Creating a custom sticker design has never been easier with our online tool. Whether you want to upload an image, add personalized text, incorporate artwork from our extensive clipart library, or even generate a QR code, our tool has you covered. You can start from scratch or choose from hundreds of templates available on our site.
Let's take a closer look at the features of our tool using one of our fundraising templates as an example. Suppose your high school football team just won the state championships, and you want to create a sticker to celebrate their victory.
Upon examining the template design, you may want to make some modifications. For instance, instead of the helmet shown in the template, you prefer to display the school logo. While you can't remove individual background elements, you can change the color of the helmet to match the background, effectively hiding it.
Next, you can upload your school logo from the "Upload" tab. Once uploaded, you can resize it and position it as desired. You can also add text elements or clipart, such as footballs, to enhance the design. The tool allows you to customize the color, size, and orientation of each element to fit your vision perfectly.
After making all the desired changes, you can add the sticker to your cart and proceed to checkout. We hope this overview of our online design tool gives you the confidence to unleash your creativity and create stunning custom stickers for any occasion.
In this informative video, we'll explore five essential features of the sticker design tool, offering valuable tips and tricks to streamline your design process and enhance efficiency. Whether you're a seasoned designer or just starting out, these insights will help you maximize the potential of the design tool and create stunning stickers with ease.
Firstly, we'll delve into product details. Before diving into the design tool, you'll select your preferred size, material, and quantity. However, if you need to make changes mid-design, simply proceed to the next step, where you can update any product details before finalizing your sticker.
Next, we'll discuss custom text. Most templates include placeholders for custom text, which you can easily edit by clicking on them or selecting them from the layers panel. To ensure your sticker matches your design intent, remove any unwanted custom text placeholders effortlessly using the remove layer button.
For oval and circle designs, curved text can add a polished touch. Learn how to curve text along the edge of your sticker by selecting the text layer, opening the Advanced Options, and choosing a top or bottom curve from the text art drop-down. Adjust the size of the text and art to seamlessly integrate with your design.
One standout feature is variable data. Discover how to personalize stickers with individual names or details by changing the text type to a comma-separated list and entering each item. Watch as the quantity automatically updates to reflect the number of items in the list, simplifying the customization process.
Finally, we'll explore using images as backgrounds. Elevate your sticker design by incorporating personal photos or professional images. Learn how to add and resize images, ensuring they enhance your design without covering other elements.
By mastering these tips and tricks, designing captivating stickers online becomes a breeze. We hope these insights empower you to unleash your creativity and craft exceptional stickers that leave a lasting impression.
About The Customizable Printed Sticker
Customizable Printed Sticker

Frequently Asked Questions
How do I apply the stickers?
We have a comprehensive set of instructions on our Applications Instructions page and a set of these instructions will be mailed with each sticker order.
How long do stickers last?
The life of a sticker depends on the type of sticker material and where its placed. Stickers made out of vinyl and adhesive have a lifespan of up to 5 years while stickers made from cling last up to 6 months. Some specialty materials such as glow in the dark vinyl is not intended for long term outdoor use however it will still last indoors for up to 5 years. Perforated film that creates one-way visibility with its perforated vinyl pattern will last up to 3 years.
For more detailed information on the types of materials we offer check out our stickers materials page.
Best Practices For Uploading A Graphic
Uploading an existing image or design to create a custom sticker is easy! However, there are some common issues with uploaded files that can hold up the production process. Below are a list of best practices for uploaded files that can help you avoid delays in receiving your order.
Embed Images/FilesWhen you place an image or file into your illustrator document, make sure the file is embedded. With the placed file selected, you can see whether the image is Linked or Embedded in the top left corner of the document.
Outline FontsAfter you’ve designed your sticker in Illustrator or other design software, make sure that your fonts are outlined. When artwork is submitted without outlined text, we may not have the fonts needed to print your design as you created it.
White StickersIf you are ordering a sticker where the only color in the design is white, you can choose from a white transfer sticker or a clear vinyl sticker with the design printed in white. Transfer stickers have the design cut out of a piece of white vinyl and then have the background elements removed. Clear vinyl stickers have the design printed in an opaque, white ink and can either be die cut around the shape of your design or cut to a standard shape, such as a circle, square, or oval.
**In some cases, where a transfer sticker is too small to cut, we may recommend changing to a sticker printed on clear vinyl.
Cut Paths On Sticker SheetsWhile ordering a sticker sheet, cut paths are signified by a 1 pt. stroke around your artwork. The stroke must be a spot color with the name “CutContour." For detailed instructions on how to add cut paths to your artwork in Adobe Illustrator, please view this short tutorial video.
If you would like a sticker sheet, but don’t want to worry about setting up your own cut paths, simply select the “I need cut paths” option.
Submitting Transfer Sticker Artwork As A Black ImageWe often receive white artwork on a black background from customers who want to purchase a white transfer sticker. Please submit your artwork as a black image on a white background. Once you upload your file you will be able to select the color of your sticker.
Transfer Sticker File Types| Preferred Files | Not Preferred Files | Do Not Submit |
|---|---|---|
| .EPS | .JPG | MS Office Files |
| .AI | .JPEG | |
| .PSD | ||
| .TIF | .PNG | |
| .CDR |
You can check your file type by looking at the extension at the end of your file name. Example: transfer_sticker_file.eps
Printed Sticker File Types| Preferred Files | Not Preferred Files | Do Not Submit |
|---|---|---|
| .EPS | .TIF | MS Office Files |
| .AI | .CDR | |
| .JPG | ||
| .JPEG | ||
| .PNG | ||
| .PSD |
What is Sticker Lamination?
Lamination is a type of manufacturing that adds a layer of material in order to improve the durability, strength, and appearance of a sticker. We use lamination to permanently add a protective layer of material. Lamination is an extra layer applied to the top of printed stickers that is scratch and acid-rain resistant and will increase the lifespan of your sticker by 1-3 years. It offers a high level of UV protection and protects the sticker from moisture and abrasion. Lamination will also alter the finish of the sticker, making it either glossy or matte in appearance. Lamination is FREE!
Sticker Layers:
- Protective Laminate Layer
- High-Resolution Digital Print
- Superior Sticker Material
Why We Provide Free Lamination for All Stickers
For years here at Carstickers we charged extra for lamination because it was such an added value for our product.
However, we have recently decided to laminate every sticker free of charge!
We’re so excited to provide this extra value to all of our customers because we know how important lamination is to the durability and visibility of our products.
Just choose between matte and gloss lamination, and your beautiful stickers will be shipped to your door all free of any additional fees.
Why We Laminate Stickers:
- Resists Scratching and Abrasion
- Weather and Water Resistant
- UV Protection
- Choice Between Matte or Gloss
- Improved Durability
Matte Lamination
Matte lamination gives a beautifully subtle, flat effect that looks great on any stickers.
The lamination forms a protective coating over the print that improves durability, UV protections, and weather proofing.
Matte laminated stickers are great for a sleek look that doesn’t reflect light.
Gloss Lamination
Gloss lamination adds a high profile sheen that is often used on brochures, menus, magazine covers or presentation folders.
Gloss lamination is a high impact option which forms a protective coating over the sticker which makes a wonderful shiny feel.
What is a die cut sticker?
Die cut stickers are stickers that are cut out around your artwork to fit the design and give the artwork its own unique shape. They are highly customizable and look more professional than a standard cut sticker or car decal. For business owners, these are our most popular type of sticker.
Raster art vs. Vector art
One way designers get around being stuck with one size is to design in vector art programs (typically Adobe Illustrator and Corel Draw). Vector art programs use paths and shapes instead of pixels (Raster images) to determine shape and color. These shapes and paths can be enlarged and are not dependent to a pixel size, so their quality remains intact when sized. Typically people use vector programs to create logos and text, but are popular amongst designers because of their friendliness towards scalability. Visit our vectorization to find out about getting YOUR artwork vectorized.
How Thick Are Your Stickers?
Our stickers come in a variety of thicknesses based on material type and lamination options. Please see the table below to find the thickness of the sticker material you are looking for. We have included the thickness of the sticker alone as well as when it is still secured to the backing.
Sticker Material Thickness
| Sticker Material | Thickness of Sticker | Thickness of Sticker with Backing |
|---|---|---|
| White Cling | 4.33 mil | 8.27 mil |
| Clear Vinyl | 4.33 mil | 8.27 mil |
| Front-Facing Cling | 4.33 mil | 8.27 mil |
| Reflective Vinyl | 11.8 mil | 17.7 mil |
| Permanent Adhesive | 4.33 mil | 8.66 mil |
| White Vinyl (Most Popular) | 4.33 mil | 8.27 mil |
| Glow in the Dark Vinyl | 13.0 mil | 18.9 mil |
| Front-Facing Adhesive | 4.33 mil | 8.27 mil |
| Perforated Film | 6.7 mil | 12.6 mil |
| Clear Cling | 4.33 mil | 8.27 mil |
How Are Stickers Measured and Priced?
At Carstickers.com, we measure and price all our stickers based on square inches. The easiest way to figure out the square inches of a sticker is to multiply the width by the height. For example, a sticker that is 4”W x 4”H (4 inches wide and 4 inches high), and a sticker that is 2”W x 8”H (2 inches wide and 8 inches high), will cost the same because they are both 16 square inches.
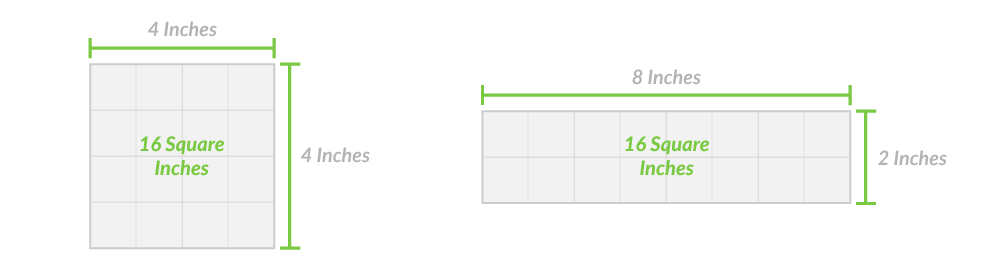
These measurements are based on the widest and tallest areas of the sticker's shape when a straight line is measured from left to right and top to bottom.
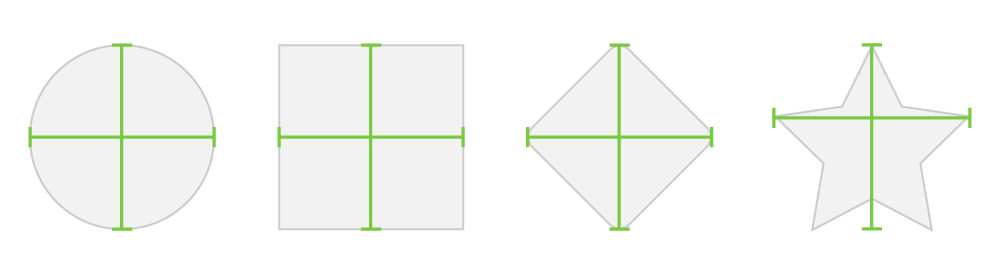
Please note: The measurements are taken when the design is upright and in the same position as it will be applied. This ensures the sticker you order will fit in the space intended. In theory, a diamond-shaped sticker could be rotated 45 degrees and measured as a square, but a 3”x3” diamond and a 3”x3” square rotated 45 degrees are not the same size and will not fit in the same space.
Our Customers Love Us!

The Difference Between Printed and Transfer Stickers
Unsure if you should order a Die Cut sticker, a Single-Color Cut-Out Sticker or a multi-Color Cut-Out Sticker? This short video will give you examples and a quick overview on the different sticker types.
View Video Library