Still need help?
Talk to a real person. Mon-Fri, 7:30am to 4:00pm PST.
Chat With Us
Message one of our team members for help.
Yes, you can design your own decals using your logo, artwork, or custom text. Transfer decals are a popular option for creating custom decals with a clean, background-free finish, especially for lettering, logos, and window graphics.
Transfer decals adhere best to smooth, non-porous surfaces such as glass, painted metal, plastic, vehicles, and laptops. Applying decals to a clean, dry surface helps ensure strong adhesion and long-lasting performance.
Our transfer decals are made from ORACAL® 651 intermediate film, a durable 3.0 mil material designed for clean, background-free vinyl decals. It is commonly used for logos, lettering, and signage due to its strength, flexibility, and long-term outdoor performance.
Transfer decals made from standard vinyl are rated to last up to 6 years outdoors. The material is weatherproof and UV-resistant, making it ideal for long-term use on vehicles, windows, and outdoor signage.
Our etched glass vinyl material is a specialty textured film designed to simulate the look of sandblasted or frosted glass. It's a 3.0 mil thick vinyl that provides an upscale, etched finish and is ideal for indoor or outdoor use on glass and windows.
Yes, etched glass vinyl is rated for both indoor and outdoor use. It's weather-resistant and can last up to 5 years when applied to clean, smooth glass surfaces such as office windows, doors, or storefronts.
No, the vinyl is not laminated. The material itself is engineered for durability and color stability without needing an additional protective coating.
Once applied, etched glass vinyl gives the appearance of frosted or sandblasted glass. It diffuses light without completely blocking visibility, creating a professional and elegant look that’s popular for business signage or decorative privacy applications.
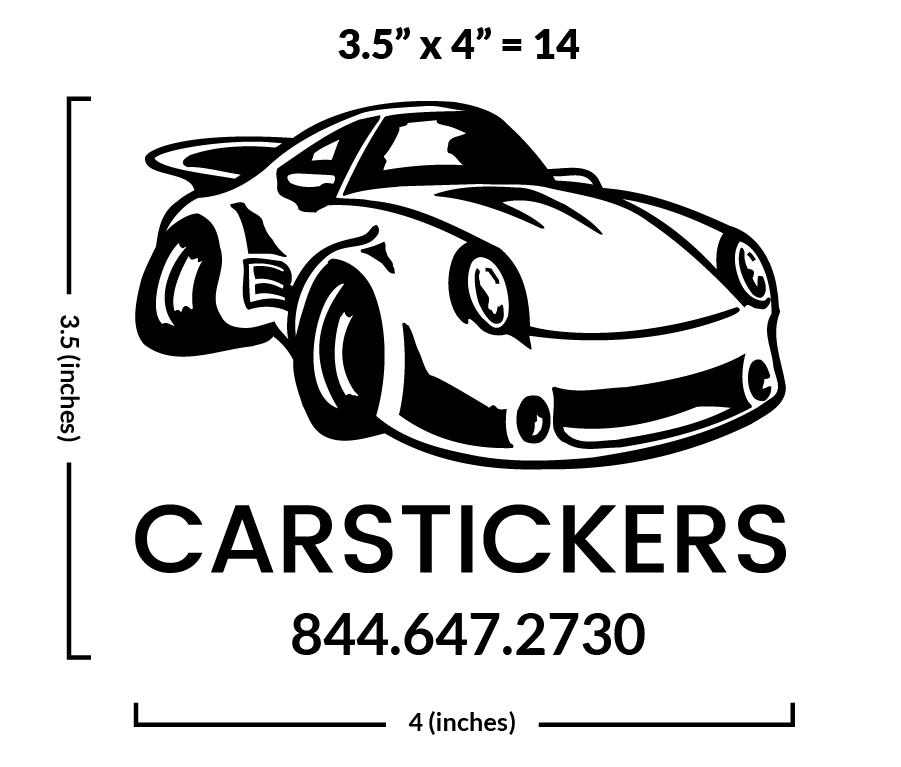
To measure a transfer decal, use the outermost points of the design. Measure both the width and the height, then multiply these two numbers to calculate the total square inches of your sticker.
This specialty material is used for transfer stickers, vinyl lettering, and vinyl numbering. Each design is cut from etched glass vinyl and applied using transfer tape for a clean, no-background finish.
Standard vinyl is used in our transfer decals, vinyl lettering, and custom vinyl numbers. Designs are cut from solid-color vinyl and applied with transfer tape for a seamless, professional look.
It is not uncommon for the transfer tape to separate slightly from the decal backing in a few places during shipping. This is normal and easy to fix. Simply pull the transfer tape away from the backing about halfway across the decal. Then replace it slowly, smoothing the area with the flat part of your hand from the middle of the sticker out to the edge. Then repeat this process on the remaining side.
For a demonstration, please watch the video below.
Transfer decals are a type of custom decal sticker made from solid vinyl and applied with transfer tape so only the design remains once installed, with no background.
Transfer decals are best for simple, single-color designs like logos and lettering, while printed stickers are better for detailed, multi-color artwork.
Etched glass vinyl is translucent but not transparent. It lets light through while obscuring detailed visibility, which makes it ideal for decorative privacy or semi-private window applications like office partitions or glass doors.
To ensure we create the best possible transfer decals for you, please follow these guidelines:
We also offer printable application instructions for transfer decals.
The majority of the stickers we make have 20 or fewer picks. If your custom transfer decal has more picks, an additional charge will apply based on the number of picks. Below is our pricing guide for transfer decal picks:
| Picks | Price (per sticker) |
|---|---|
| 0-20 | Free |
| 21-30 | $0.25 |
| 31-40 | $0.50 |
| 41-50 | $0.75 |
| 51-60 | $1.00 |
| 61-70 | $1.25 |
| 71-80 | $1.50 |
| 81-90 | $1.75 |
| 91-100 | $2.00 |
| 101-120 | $2.25 |
| 121-130 | $2.50 |
| 131-140 | $2.75 |
| 141-150 | $3.00 |
| 151-160 | $3.25 |
| 161-170 | $3.50 |
| 171-180 | $3.75 |
| 181-190 | $4.00 |
| 191-200 | $4.25 |
Yes, printed transfer decals are available on a variety of specialty materials, including metallic, holographic, glitter, and glow-in-the-dark vinyl. These options allow you to add unique visual effects while maintaining a clean, background-free design.
The smallest letter size we can reliably cut is 0.25 inches tall. Smaller text may not weed properly or adhere well. If your design includes very small details, our team may adjust it to ensure the best results.
“Picks” refer to the small pieces of vinyl that must be removed from inside a design during production, such as the centers of letters like “O,” “P,” or “A.”
After cutting, these sections are removed by hand in a process called weeding. Designs with more picks require additional time and precision, especially for detailed lettering or intricate artwork.
This process ensures clean edges and a professional, background-free appearance once applied.
Transfer Decals are named for the way they are applied by transferring the sticker from its backing onto transfer tape, and then from the transfer tape onto the intended surface. These stickers are ideal for simple designs, such as basic text or silhouetted artwork. The process of creating a Transfer Decal involves the following steps:
Here's an example of a standard Transfer Decal: the trunk and leaves of the tree have been cut out of a sheet of green vinyl, leaving just the design, which is covered with transfer tape. The white backer remains attached until the transfer tape is fully removed.

Printed Transfer Decals are similar to standard Transfer Decals in terms of application and production. However, instead of being cut from a roll of solid-colored vinyl, they are cut from a roll of standard white vinyl that has a printed design on it. These stickers are great for designs that are as simple as Transfer Decals but require more than one color. A typical example could be a multi-color logo where the letters or shapes are not connected to each other.
Here's an example of a Printed Transfer Decal: it's similar to the previous design but now uses two colors, requiring the design to be printed. As with the previous example, the backing material is still present, as the transfer tape has not been fully removed.

Printed stickers allow for more complex designs compared to transfer or Printed Transfer Decals. The key difference is that the cut path goes around the outside of the sticker as a whole, rather than around individual shapes or inside letters. If a Printed Transfer Decal is too complex to produce, a printed sticker on clear or white material might be a better option. Our printers can achieve a high level of detail, and if printed on clear material, the surface behind the sticker will still be visible'an advantage typically reserved for Transfer Decals.
Here's an example of a printed sticker: the tree design now has leaves with unique strokes around the outside instead of being filled in. Creating a multi-colo
A transfer decal is created by cutting sticker material to a shape, graphic, or text, and then removing the background. transfer decals are not printed on but instead are cut from a colored sheet of vinyl. If you would like a sticker with multiple colors but no background, you should order a Multi-Color transfer decal.
All of our transfer decals come with three elements. The first is the backing of the vinyl sheet, which is the paper layer that the vinyl is originally cut from. The second layer is the sticker itself, cut by our plotters to your exact design. Finally, we add a top layer of transfer tape to allow you to place the sticker exactly where you want on your material.
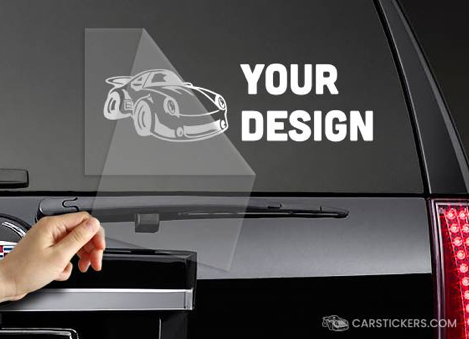
When you get your transfer decal in the mail, just lift the sticker and peel the white paper backing off of the adhesive. Then, while holding the clear transfer tape, line your transfer decal with the material underneath and place it on the surface. If you have any air bubbles in the sticker, gently rub from the middle to the edges until the sticker lies flat. For more, see the Application Instructions Page or watch the video below:
Transfer tape is a clear application film that holds your decal together during installation. It keeps letters and design elements aligned so you can position the decal accurately.
Once the decal is applied to the surface, the transfer tape is removed, leaving only the vinyl design behind.
Yes, transfer decals can be removed, but they are designed for long-term use and are not reusable. When applied properly, they adhere securely to surfaces like glass, metal, and plastic.
To remove a decal, peel it away from the surface. Heat (such as a hair dryer) can help soften the adhesive, and any residue can be cleaned with rubbing alcohol or adhesive remover.
Because they are made from durable vinyl, transfer decals are best suited for applications where long-lasting performance is desired.
Yes, transfer decals are waterproof and designed to withstand outdoor conditions. The vinyl material resists moisture, rain, and general weather exposure, making it suitable for vehicles, windows, and outdoor signage.
Transfer decals are available in a wide range of solid vinyl colors. Popular options include white, black, silver, gold, and other standard vinyl lettering colors used for logos, window graphics, and vehicle decals.
Because each decal is cut from a single piece of vinyl, designs use one color. For multi-color or full-color artwork, explore our printed transfer decals.
Learn how custom transfer decals are made and applied without a background. This video shows how precision-cut vinyl and transfer tape work together to create clean, professional results.
Message one of our team members for help.
Subscribe for tips, offers, and product news! Plus, enjoy 10% off your next order!