What is transfer tape?
Transfer tape, also known as application tape, is a paper or plastic film that can be placed on the top of the sticker or piece of vinyl to make the sticker easier to apply. Transfer tape allows the installer to see exactly where they are placing the sticker on the substrate. Substrate is the term used for the material a sticker is being placed on, such as a window, car door, plastic sign, or anything else you like!
There are many different types of transfer tape, varying from paper, plastic, rolls and sheets. Here at Carstickers we make buying transfer stickers easy by using high quality clear plastic application tape. This works well with cut out stickers that have many different parts because it maintains the positions all of the letters and artwork of your sticker.

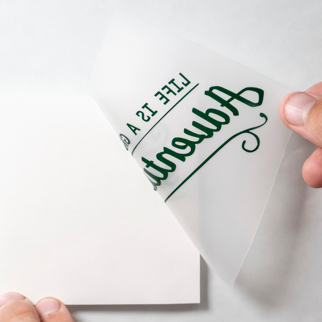
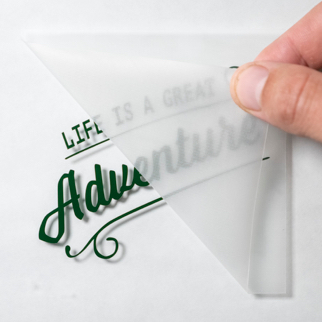

Clear tapes are transparent because they’re made from plastic face films instead of paper. The clear plastic construction provides the transparency that is needed for our customers easy placement stickers. With the car windshield, water bottle, laptop or any other substrate surface clearly visible, the installer can clearly see how the sticker will look when placed. Due to the non porous plastic material of the transfer tape, we recommend applying the stickers on a clean and dry surface.
To help you understand why transfer tape is so important to your sticker, here is our step by step process to producing transfer stickers:
STEP 1
After our customers choose one of our premium graphics, upload their own, or creates something new using our custom sticker maker, they select the color and size of the transfer sticker.
STEP 2
Our Graphic Design team then takes the design and prepares it for processing, ensuring that the design will look great for our customers.
STEP 3
Our talented processing team then takes a premium sheet of the selected vinyl color and runs it through a plotter. The plotter is a machine that cuts vinyl to a specified shape or design.
STEP 4
Once we’ve cut out the graphic, our team pulls the excess vinyl away from sticker (called topping) and carefully weeds the excess vinyl with a specialized tool.
Weeding spaces in between letters such as “A” and “O” are called picks.
Too many picks are very time consuming thus require an extra charge.
See our Counting Picks on a Transfer Stage page for more.
STEP 5
When the graphic is topped and weeded, we roll our high quality clear plastic transfer tape over the graphic.
The sticker is then cut to our customers specified dimensions.
Leaving the sticker in a sandwich between the vinyl backing and our transfer tape.
Can't find what you're looking for?
Our Customer Service Team Is Here To Help
Call Us
Call us toll free at 844-647-2730 to speak with a Customer Service Representative. We are available Monday - Friday from 7:30 am to 4:00 pm PST
Email Us
Email us at sales@carstickers.com with any questions. We are available Monday - Friday from 7:30 am to 4:00 pm PST
Chat With Us
Chat live with our Customer Service team to answer any questions you may have. We are available Monday - Friday from 7:30 am to 4:00 pm PST.